

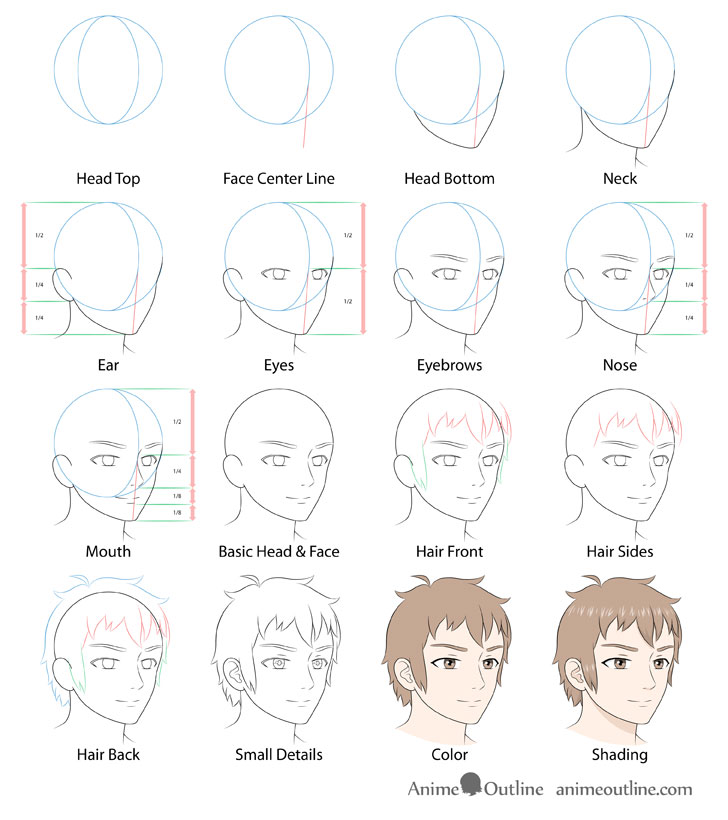
How To Draw Anime Head 3/4 View
This tutorial shows how to draw a male person anime or manga style male face in 3/four view with detailed step by step drawing examples.
It tin can be fairly challenging to make a proper 3/4 view drawing of the head including heads and faces in the anime style.
To brand things easier to understand this tutorial provides a very detailed breakup of the cartoon process with sixteen steps in total.
If you are going to exist following the tutorial using pencil and paper it'southward recommended that you start with lite lines as you will need to erase parts of the drawing in betwixt some of the steps.
Step 1 – Depict the Height of the Head
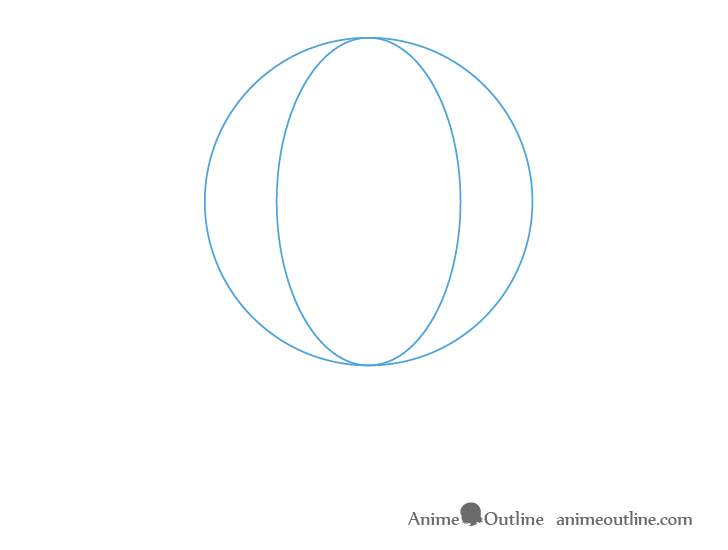
Begin by drawing a circle to establish the basic shape of the top of the caput.
Now thinking of this circumvolve equally a transparent 3d sphere. Within it draw what would be like to a slice through an apple at a particular bending. This will establish the center of the head and the direction it'south facing in.
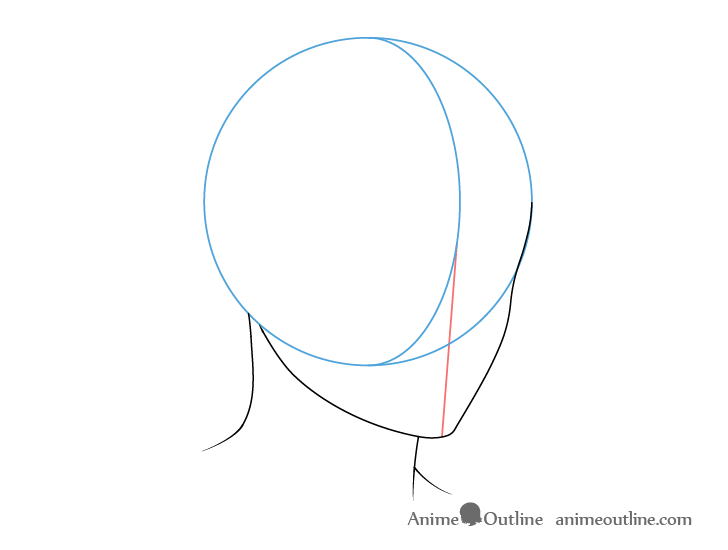
Footstep 2 – Draw the Face up Middle Line
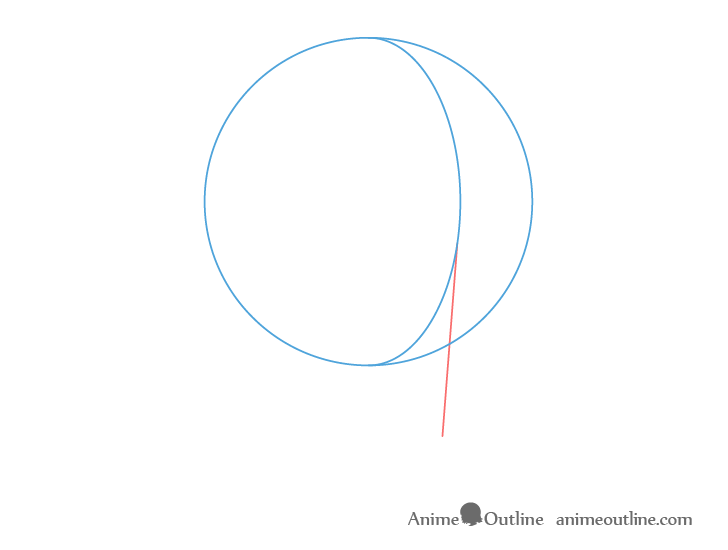
Erase the half of the oval that volition be facing towards the back of the caput (left side). From the frontwards facing part project a straight line that will represent the center of the face up. This line should be on a slight angle towards the back of the head. It should also reach down to at least the point that will exist the bottom of the mentum.
Once done you should have a basic construction cartoon to help you create the rest of the head and face.
Step 3 – Draw the Bottom of the Head
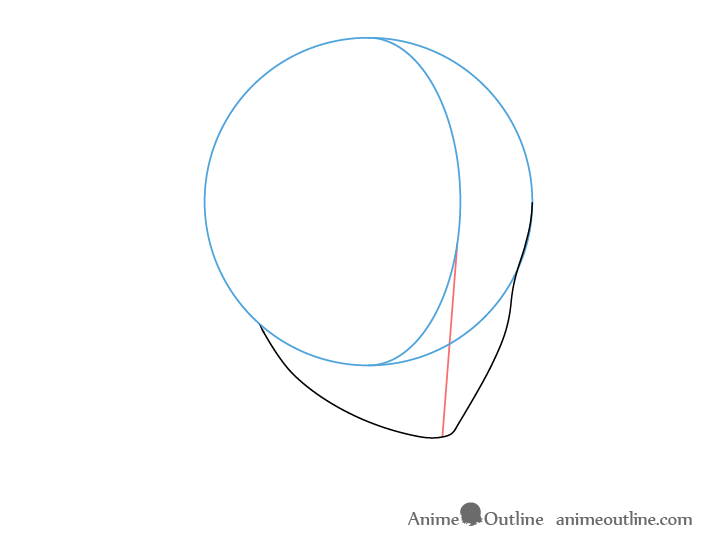
Anime faces generally tend to take very small if not outright pointy chins. Still to brand the face look a niggling more masculine in this instance the chin will exist drawn slightly flat on the very end.
Footstep 4 – Draw the Neck
While the tutorial focuses on the face you volition still desire to add the neck as well every bit just a tiny hint of the shoulders. Otherwise the drawing volition expect odd.
Generally the necks tends to exist angled forward. This angle becomes slightly less obvious in iii/4 view so draw the neck titled but a tiny chip towards the front of the face.
For a fiddling bit more on drawing necks see:
How to Draw Anime Neck & Shoulders
Step five – Draw the Ear
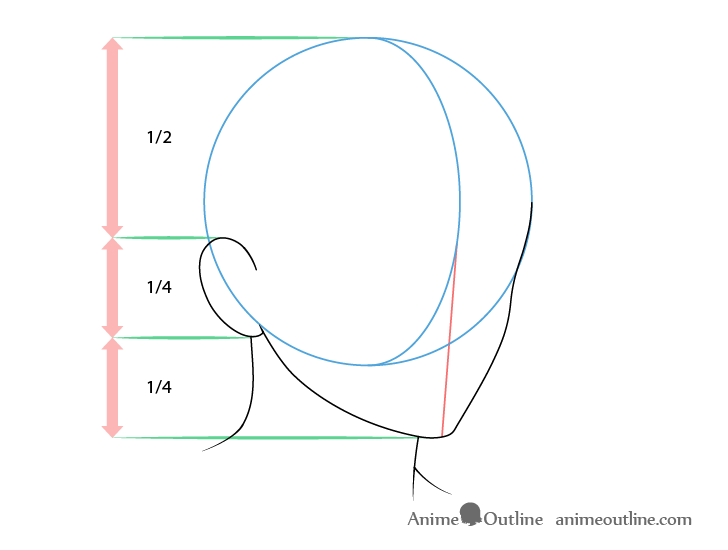
Onto the head add the ear (the other one will be subconscious backside the head). Brand information technology about as alpine as 1/iv of the head with it's elevation existence at the horizontal halfway point of the head.
Stride 6 – Draw the Eyes
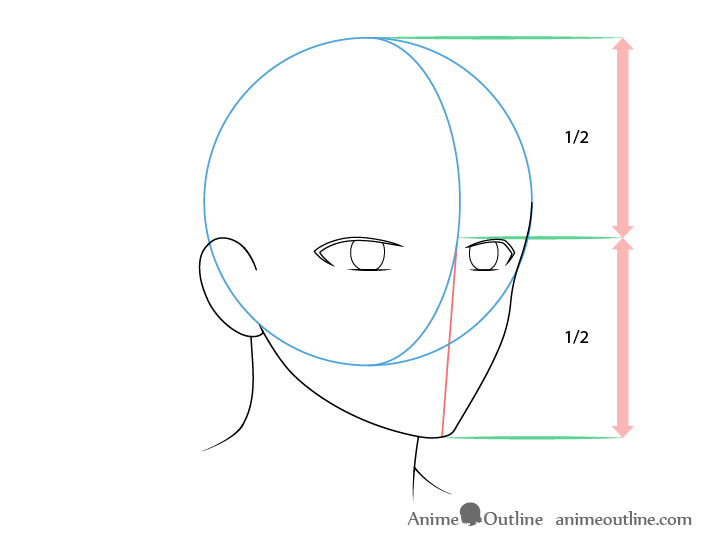
Draw a basic outline of the eyes as in the example in a higher place. Positioned them with their tops lined upward with the top of the ear (again beneath the horizontal halfway betoken of the head).
Draw the center closer to the viewer significantly wider than the other. Besides go on in mind that the eyes are slightly set in the head. To evidence this depict the middle in the front much further from the center line of the face than the middle in the dorsum.
Do not add together any of the smaller details still as that will be done in a later on step.
For more on drawing anime eyes in 3/4 view come across:
- How to Draw Anime Optics From Dissimilar Angles
Footstep 7 – Draw the Eyebrows
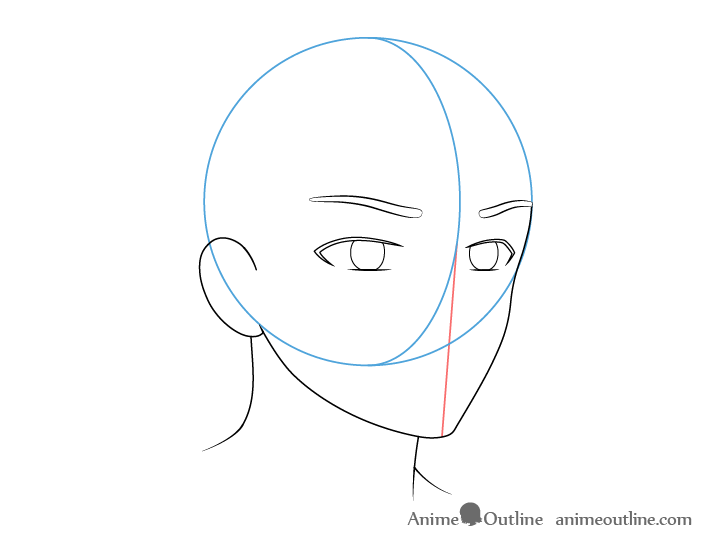
A small-scale distance above the eyes add the eyebrows. Over again to make the character a little more masculine draw the eyebrows thicker than yous would see on a typical female anime graphic symbol.
Yous can draw them in wave like shapes with the inner ends pointed slightly downwards.
Like to the eyes draw the eyebrow closer to the viewer (0n the left) wider and further from the center line of the caput than the further away one.
For more than eyebrow variations see:
How to Draw Anime & Manga Eyebrows
Step 8 – Describe the Nose
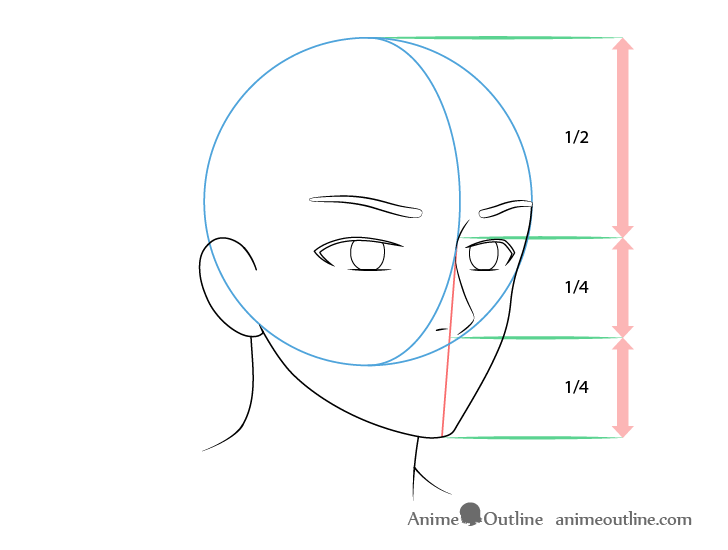
In this example the graphic symbol volition have a adequately well divers olfactory organ with but a hint of i nostril. At the same fourth dimension it volition still be adequately simplified and somewhat pointy to retain the anime expect.
Position the olfactory organ with it'south bottom at the same level as the bottom of the ears.
The bridge of the olfactory organ should transition into the area around the eyebrows. You tin can show just a hint of this on the farther side of the face with the line that defines the nose pointing towards the farther abroad eyebrow (right side).
Pace ix – Depict the Mouth
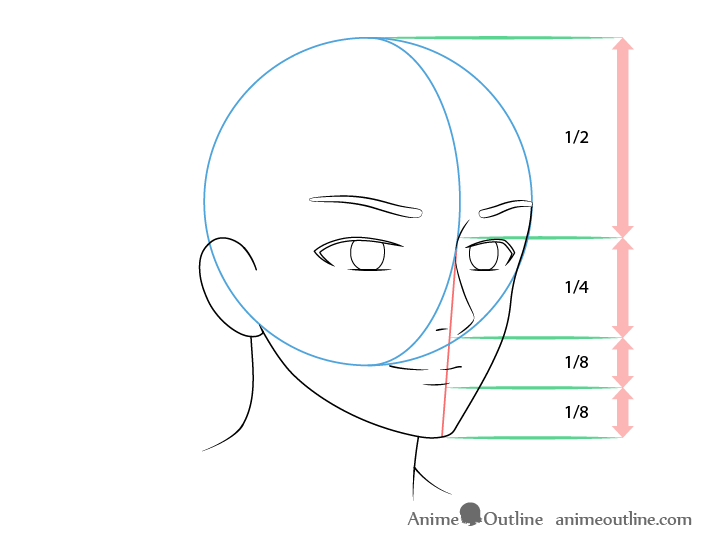
Finally add the mouth with it's bottom lip positioned halfway betwixt the bottom of the nose and the lesser of the mentum.
Y'all tin define the bottom lip with just ane pocket-size curve and position the rima oris itself simply slightly to a higher place it. Due to the oral cavity being curved and somewhat indented in the head you will desire to draw about of it's shape to be on the frontward side of the face (left side of the center line).
As this is a male mouth yous can draw it fairly large (wide) in comparison to a female one. To make information technology look a trivial more natural yous tin besides add together a small pause in the bend that defines it (this is fairly common in anime).
For more on drawing anime mouths see:
- How to Draw Anime and Manga Mouth Expressions
- How to Depict Anime & Manga Mouths – Side View
Step x – Clean up the Cartoon
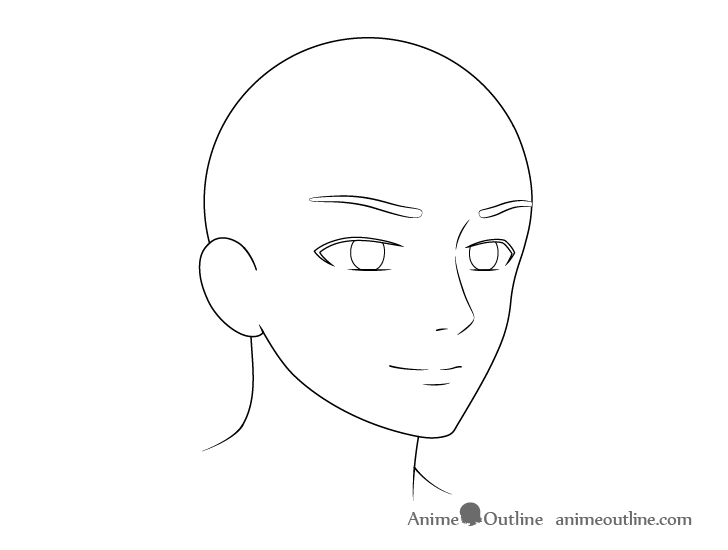
At this stage clean upwards your cartoon by erasing all of the construction lines. In one case done you should have a simple outline of an anime style male person head and confront without the hair or any of the smaller details of the optics/ears.
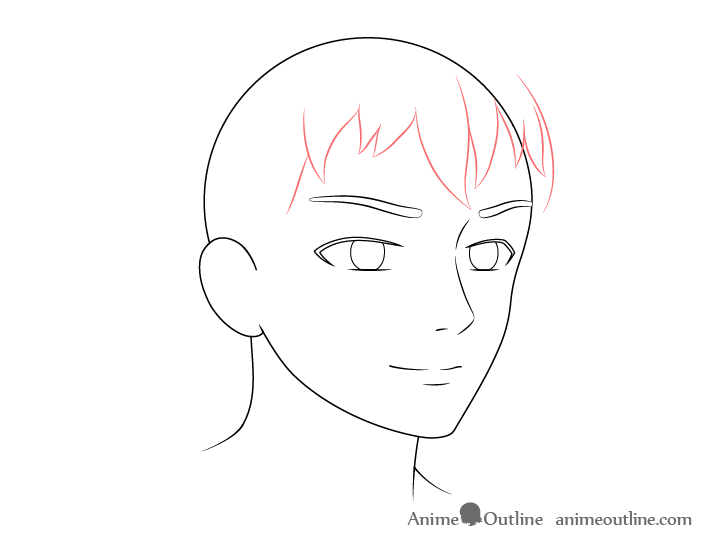
Step eleven – Draw the Front Department of the Hair
To add the hair we will employ the cartoon approach define in this tutorial:
How to Describe Anime Male Hair Pace past Step
To summarize it the pilus will be split into the frontwards, sides and back sections shown in red green and bluish.
The reason for this is to make the cartoon process easier to manage and sympathise instead of simply seeing things equally 1 large clump of hair.
Begin by cartoon the front end section of the pilus as shown to a higher place.
In this case the character will have fairly natural looking somewhat messy hair of medium length.
For hair like this draw it in fairly large clumps pointing in slightly different directions.
Footstep 12 – Draw the Side Sections of the Hair
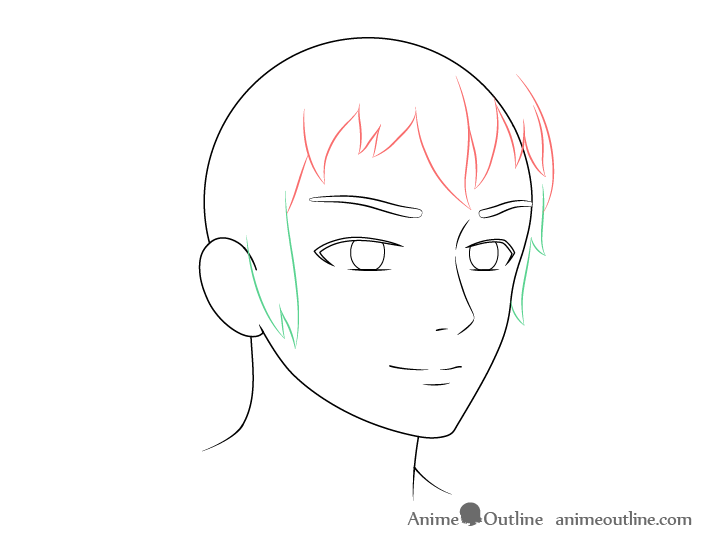
Add together the side sections shown to a higher place with simply a few clumps going down to well-nigh the bottom of the nose. Likewise keep in mind that the background part of the hair will exist partially subconscious by the head.
Step 13 – Draw the Back Department of the Hair
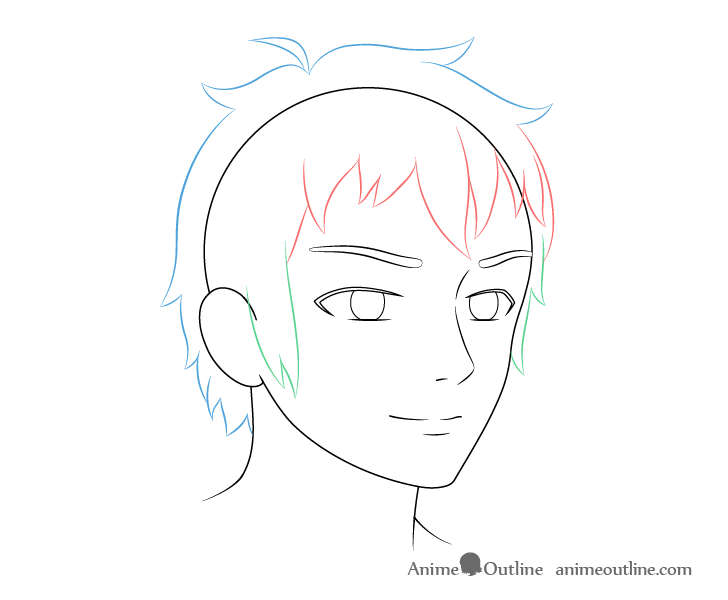
Finally add the "dorsum section" of the hair with larger and more spread out clumps towards the top and smaller and more grouped up clumps at the very bottom.
Step 14 – Draw the Pocket-size Details of the Facial Features
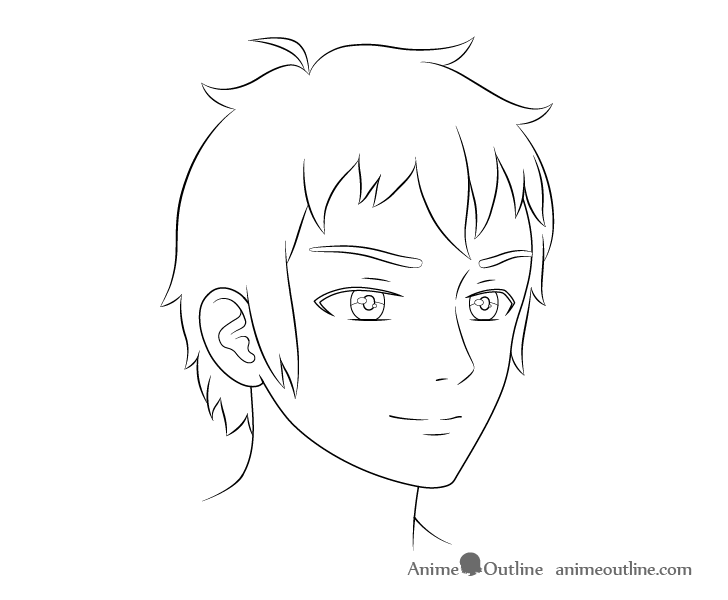
At this phase erase the parts of the head hidden past the pilus and add the inner details of the eyes and ears.
The areas that yous volition desire to ascertain within/around the eyes are:
- The pupils – aforementioned or like shape equally the irises merely smaller
- The highlights (low-cal reflecting from optics) – in this case a large and a small one in each heart
- The darker/shaded summit areas – upper halves of the irises
- Eyelids – just a hint with a pair of lines slightly above the eyes
For a step by pace breakdown of the various parts of the eyes see:
How to Draw Male person Anime & Manga Eyes
You tin can also add together the inner details of the ear as shown the example above.
For more than on drawing ears run across:
How to Draw Anime and Manga Ears
Once finished with this stage of the drawing yous can darken your lines by tracing over them. However leave the lines defining the eye highlights and shadows light as y'all desire those to blend into the colour/shading.
Step 15 – Apply Color

Once washed with the line drawing you can add some colour.
If coloring on paper you may want to exit the highlights in the hair (shown in next step) white. Equally these can exist adequately random you do not necessarily need to outline them before hand simply you can if yous find it easier to do and then.
Alternatively yous can add the highlights in over meridian of the pilus with a white correction pen or white paints. If drawing digitally it's recommended that you add together the highlights in over tiptop of the color as well.
If you detect that the highlights await too bright you tin very lightly shade them with the same colour every bit the hair.
For more than on drawing hair highlights see:
Different Ways to Draw Anime Pilus Highlights
You may likewise find that the upper parts of the eyes/irises are shaded darker than the rest of the eyes. This is of import because the eyes tin wait odd without this (similar the character has a crazy stare). To avoid this shade in the eyes even if y'all want a simpler cartoon without the shading shown in the next step.
Step 16 – Add Shading to Cease the Drawing

To finish the drawing you can add together some more basic shading to several areas of the face. As in many other tutorials here on AnimeOutline the shading will be washed in a adequately generic way. Meaning that the shadows volition be added in places where they are likely to occur in mutual lighting conditions such as a well lit room or daytime outside.
For this type of shading add shadows in the post-obit places:
- Bottom tips of the hair clumps
- On the head (bandage by the hair and similar in shape to the hair clumps)
- Around the eyelids
- Upper parts of the white of the optics (cast by the eyelashes)
- Inner parts of the ears
- Below the nose
- Upper function of the neck (bandage by the caput)
For more on shading pilus see:
How to Shade Anime Hair Footstep by Step
For shading faces in different types of lighting see:
How to Shade an Anime Face in Unlike Lighting
Conclusion
Drawing a face in 3/four view can exist a claiming merely yous can make the process more manageable by using a pace by step arroyo. Work from larger shapes down to the smaller details and try and confirm that y'all did things correctly in 1 step earlier moving on to the next. You can also build your drawing around simpler shapes and utilize construction lines equally guides to assistance you.
For more on good drawing practices see:
Beginner Guide to Cartoon Anime & Manga
For more on drawing male person faces cheque:
How to Draw Male Anime Characters Step by Step

Source: https://www.animeoutline.com/how-to-draw-male-anime-face-3-4-view-step-by-step/
Posted by: stormplacrour.blogspot.com
0 Response to "How To Draw Anime Head 3/4 View"
Post a Comment